Footer logos
You will require this information when you would like to insert persistent images in the footer of your website.
Step-by-step guide
- Navigate to your images library (ensuring that you are logged in with the appropriate privilidges).
- Create a new section using the 'Add new' drop down menu. This section will be used solely to contain the images that you would like to display in the footer of your website.

- Name the new section anything that you would like, and click 'Save' at the bottom of the form.
- Once you have saved the form, you will be taken to your new, empty section.
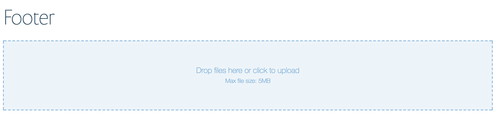
- Upload the files into the new section that you have created using either the image drop box, or the 'Add new' menu on the edit bar.
- Once you have uploaded the images that you want to display in the site footer, you can define a URL that you want the logos to permenantly link to. To do this, you will need to navigate to the image, click 'Edit' on the edit bar, and then populate the field 'An optional url that the image will link to' with the URL that you want the image to link to.
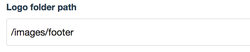
- Once you have added the images into the section that you want to display in the footer, you will need to copy the URL path of the folder the images now sit in, e.g. '/images/footer'
- Next, navigate to the 'Site setup'
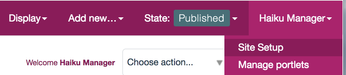
- Once in the 'Site setup' select the 'Haiku' option from the 'Add-on configuration' options

- On the 'Haiku' management page, navigate to the tab 'Footer'
- Into the 'Logo folder path' field, paste the path of the folder that contains the footer logos
- The next field is a selection field that allows you to define whether the footer logos display on all pages across the site, or whether the footer logos only display on the homepage. If you would like the footer logos to show only on the homepage, check the box of the field 'Display logos only on homepage'
- Once you have made these changes, click 'Save' at the bottom of the form, and the images will then display.
- Going forwards, to add or remove logos from the site footer, simply do so by adding or removing images from the folder that contains your footer logos.
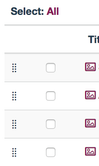
- If at any point you want to reorder the images in the footer of your website, navigate to the folder containing the footer logos, and select 'Contents' from the edit bar

- Once in the folder contents view, you can reorder the images by dragging them up and down using the dots to the left of the item name, this will in turn reorder the logos in the footer, when you refresh the page
Related articles