Creating a profile
You will require this information when you wish to add a new profile or edit an existing one.
Step-by-step guide to add a new profile:
- Navigate to the section of your website that contains the profiles (ensure that you are logged in and have the appropriate editing rights)
- Using the 'Add new' menu on the edit bar, select 'Profile'
- You will be taken to a form with four tabs, and eight fields to create the new profile. You will only need to use the 'Default' tab, the other tabs are populated automatically, a the profile is used across the Haiku site:
- 'First name' - This field is for the persons first name
- 'Last name' - This field is for the persons last name
'Username' - If you are using the Oxford University Single Sign On (SSO) system, this field is for the users SSO username. NOTE: SSO usernames are case sensitive. Using the Oxford SSO system will automatically pull in the persons publications from Symplectic, if they have any. If you are using the local roles (creating user accounts directly into Haiku), then this should be a suitable username such as initial of first name followed by the users last name, e.g. 'Joe Bloggs' would be 'jbloggs'
- 'Email' - This field is for the persons email address
- 'University' - If used, this will automatically show the logo of the selected university instead of the persons profile image.
- 'Profile type' - There are three options available for this field:
- 'Full profile' - This is the most common profile type to select. This will create a new profile that allows the user to have full control over the tiles that they select to display, as well as the layout of these tiles. The profile will appear on landing page for the team section, as well as having an individual landing page for the profile.
- 'Stub profile' - This profile is used for showing only very basic information about a person, and having the ability to reference them automatically across a Haiku site, but will not allow users to see a full detail listing page for the profile. The profile will display on the team section landing page with a profile image, name and job title (if selected and populated).
- 'External profile' ( will reveal another field on the profile creation edit form beneath the 'Profile type' field) - This profile is used for showing only very basic information about a person, and having the ability to reference them automatically across a Haiku site, but will not allow users to see a full detail listing page for the profile, instead when the profile is clicked on, the user will be directed to the page that is defined in the 'External profile link' field. The profile will display on the team section landing page with a profile image, name and job title (if selected and populated).
- 'Categories' - Use this field to categorise the profile, you can select more than one category, and the profile will show in multiple sections of the team landing page.
- 'Sortable name' - This field is used to manipulate the order that the profile is listed in. By default the team landing pages are sorted alphabetically by last name. However, should you wish to manipulate where on the team page a profile shows, you can do so by entering letters or combinations of letters into this field to move a person in the sort order.
- Save the form to ensure that the profile is created, you will be taken to the profile detail page.
By default, when you create a profile on a website that is integrated with a single sign on service, the user will automatically be granted editing access to their profile. If for any reason this has not happened, or you have to edit the username of the user, you will need to generate or regenerate the user account. You should try to recreate the user account by viewing the profile and using the drop down menu form the top right of your screen (from your name) and user the 'Create user account' option. If the user still cannot access their profile, raise an issue in the support desk.
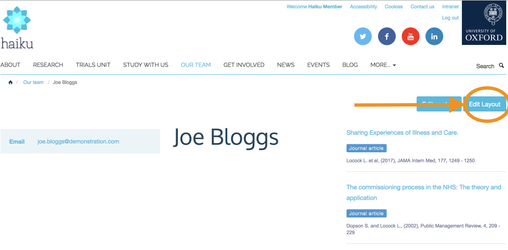
Step-by-step guide to editing the layout of a profile:
- Navigate to the profile that you would like to edit (ensure that you are logged in, and have the appropriate editing rights)
- Click on the 'Edit layout' button that is located at the top right of the profile
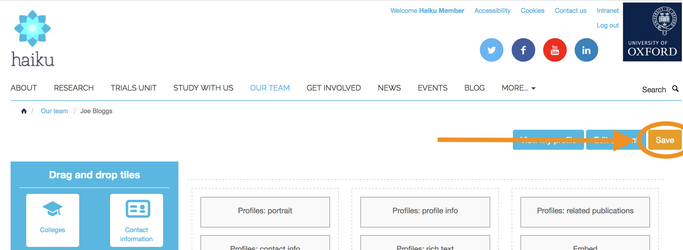
- This will take you to a page where you are able to add, remove and rearrange tiles

- To rearrange any of the tiles, simply drag and drop them between the columns, and into the order that you would like them to show. You can rearrange the tiles, even if they have content in them.
- To delete any of the tiles from the profile, hover over the tile you wish to delete, until you see a grey 'X' appear in the top left of the tile, when it does, click it and the tile will be removed. **Note** If you delete a tile by mistake, simply navigate away from the profile page layout edit screen without saving, and then go back to the layout edit, where you will see your changes have not been made.
- To add a new tile to any of the columns, click on the tile that you would like to place into a column, then drag and drop the tile in the location that you want it to display intially (you are able to come back and change the layout of the tiles at any point). When you pick up a tile from the selection menu on the left, the columsn to the right will be highlighted in blue, and turn grey to display which column the tile will be fitting into.
- Ensure that whenever you make changes to the layout of the profile page that you would like to save, click on the 'Save' button in the top right of the profile which will show as green if there are no changes to be saved, and amber if you have made changes that require saving for them to take effect. If you have made changes and not saved them, but try to navigate away from the page, you will be prompted by your browser to save the changes that you have made.
Step-by-step guide to editing the content of a profile:
- Navigate to the profile that you would like to update the content of (ensure that you are logged in, and have the appropriate editing rights).
- Click the 'Edit content' button in the top right of the profile page

- You will be taken to a screen that displays the tiles in the same layout as you view them, with dotted lines around them to help you to identify which tile is displaying which information.
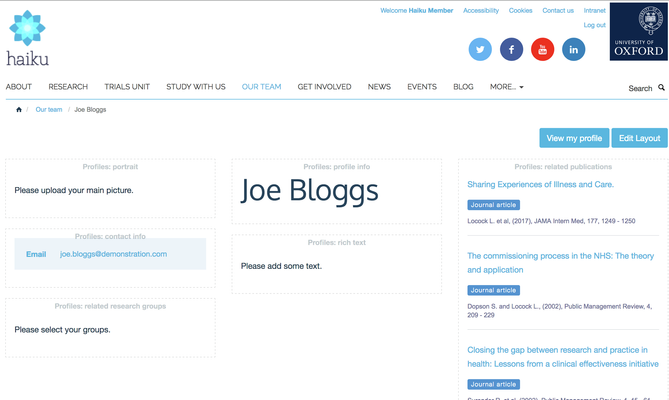
- You have the ability to edit any of the tiles that are displaying. To edit any of the tiles, hover your mouse over the tile you wish to edit, and an edit button will display in the top left of the tile
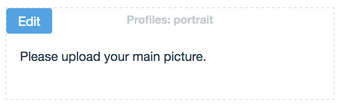
- When you click edit on a tile, a pop up will be displayed that will allow you to create or edit any of the content that is in the tile. For information on the individual tiles, please see the list of tiles here.
Related articles