Managing Candidates and Examiners
Before you can create exam and schedule Candidates and/or Examiners you need to have all your Candidates and Examiners present in Practique. There are different ways how to create Candidates and Examiners in Practique. You can either import, LDAP synchronisation (or other 3rd party integration) or manually create Candidates and Examiners.
Next step after creating/importing Candidates and/or Examiners is to schedule those when creating exams in Practique.
Creating / Updating Candidates and Examiners manually
You access Candidate and Examiner management via Settings > Candidates or Settings > Examiners screens. Screens for Candidates and Examiners are very similar as tasks you can perform are exactly the same for both as well as user interface Practique provides to perform these tasks.
For both Candidates and Examiners there is a list of existing Candidates/Examiners. Lists provide following information:
- ID - Sortable - Candidate/Examiner ID as entered or imported
- Name- Sortable - Candidate/Examiner name
- E-mail- Sortable - Candidate/Examiner e-mail address
- Role - Examiner additional Roles (Marshal, etc...)
When adding examiners, their role will automatically default to 'Examiner'.
Each Candidate / Examiner can be Removed or Edited and you can also Add or Import Candidate useing buttons Import, Add new Candidate/Examiner at the bottom of the list.
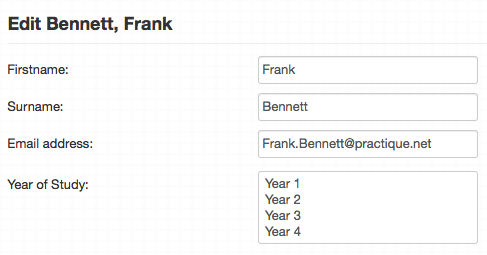
Since Practique 4.1.x you can assign Dimension to Examiner or Candidate when you Add or Edit them. All available (Applicable to Examiners or Candidates) Dimensions will be listed at the bottom of the add/edit forms and you can just select Dimensions you want to assign to Candidates/Examiners.
Both lists can be filtered using Filters in order to limit/browse/find Candidates/Examiners in the list. See Working with tagged Candidates/Examiners section for more details.
Importing Candidates and Examiners using CSV
Both Candidates and Examiners can be imported into Practique using CSV file format. You can import Candidates/Examiners from the Settings > Candidates or Settings > Examiners list views using Import button at the bottom of the screen.
CSV file needs to follow following structure in order to be successfully imported by Practique (please see column description below):
| ID | First name | Surname | PIN | Special needs | Year of Study | Phone number | |
|---|---|---|---|---|---|---|---|
| XY123450 | John | Doe | john.doe@mail.co.uk | 123450 | Extra time, Wheel chair access | Year 1 | +44123456789 |
| .... |
Column descriptions
ID - Required
Your internal identifier of the Candidate or Examiner. This value usually comes from your Student management system or it can be GMC number of Examiner and so on.
First name
Surname
Email - Required
PIN (since 4.2.x)
Examiner/Candidate PIN or Password which is used for that user to log-in into the Practique for iPad application. If you specify value for this column it will be used instead of ID column.
Example: You want to import Examiners with GMC numbers in format 'GMC1234567' but for iPad you want them to be able to login with 'L1234567' where L is letter for the exam. In that case you'd import your examiners with PIN column.
Dimension 1, Dimension 2, Dimension 3 (since 4.1.x)
Dimensions can be used for marking candidates or examiners by dimension category value(s).
Dimension must exist and must be applicable “For candidates” or “For examiners”.
For Discrete dimensions you can assign multiple categories for the same Dimension (Special needs in example above) which must be delimited by comma in a single column or only one category can be specified. If the Dimension is not discrete (eg. Free text), category value is expected in the column, for example phone number
Tagging / Grouping Candidates and Examiners (since 4.1.x)
Practique 4.1.0 introduced Tagging of Candidates and Examiners which allows users to “tag” or “group” Candidates or Examiners by the Blueprint Dimension or Category. Tagging Candidates or Examiners then allows you to work with Candidates or Examiners in groups which can be used later when scheduling exams to easily schedule for example Year 1 Students for an exam or to simply filter Candidates and Examiners for quick access to certain groups.
Blueprinting
In order to use this feature you will first need to create Blueprint dimensions (or update existing) which you will use for tagging your Candidates or Examiners.
You do this using management of the Master blueprint (see Setting up the Master Blueprint) has been improved so that each Blueprint dimension can be applicable to either Item, Candidate, Examiner or any combination of those. This allows you to tag Examiners/Candidates with existing dimensions or create specific dimensions just for tagging Examiners/Candidates.
Working with tagged Candidates/Examiners
Once you have created your Blueprint dimensions you can tag Candidates/Examiners with those. Candidates/Examiners can be tagged manually (see Creating / Updating Candidates and Examiners manually section) or you can import Candidates/Examiners already with Dimensions.
Once your Candidates/Examiners are tagged you can:
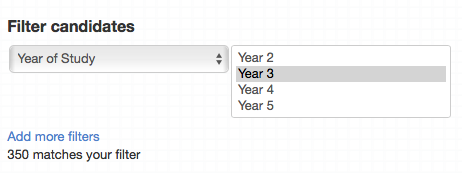
- Filter Candidates/Examiners based on the assigned dimensions in List of Candidates/Examiners
- Filter Candidates when scheduling exams in Specify Candidates step (for example schedule only Year 1 students for the exam)
Scheduling Candidates for exam uses the same Filters as in Candidate/Examiner list: